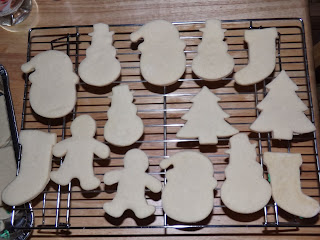
Recipe is as followed, and I will post the link where I got it from.
Ingredients:
2 1/2 cups unsalted butter (at room temperature)
2 cups sugar
2 large eggs
3 tsp vanilla
5 cups flour
1/8 tsp baking powder
1 tsp salt
Directions:
1. Cream the butter and sugar together in the bowl of an electric mixer on low to medium speed. (Use the paddle attachment). Mix until thoroughly incorporated – for about one minute. Scrape down the sides of the bowl with a plastic spatula and mix again for a few seconds more.
Over mixing the butter and sugar in this step will cause too much air to be incorporated into the dough. If you’d like a light and fluffy cookie, that’s ideal, however the dough will spread more during baking; not ideal if you’d like the cookie to hold its shape.
2. Add eggs slowly and mix. Scrape down the bowl with your spatula at least once and mix again.
3. Add vanilla extract. Stir briefly.
4. Sift your dry ingredients together. (Flour, baking powder and salt).
5. Add all of the flour mixture to the bowl. Place a large tea towel or two small tea towels between the edge of the bowl and the electric mixer so that the flour won’t escape. Mix on low speed for 3o seconds. Remove the tea towels and observe the dough mixing; when it clumps around the paddle attachment it’s ready. It’s also important at this stage not to over mix the dough (the glutens in the flour develop and the dough can become tough).
6. Roll the dough out between 2 large pieces of parchment paper. Place on a baking sheet and into the fridge for a minimum of 1 hour.
7. Roll out the dough further if you need to, and cut out cookie shapes. Place on parchment paper-lined baking sheet. Re-roll scraps and repeat.
8. Put cookie dough shapes back into the fridge for 10 minutes to 1 hour to chill again. They will then hold their shape better when baked.
9. Preheat your oven to 350°F
10. Bake cookies for 8-12 minutes or until the edges become golden brown. The baking time will depend on the size of your cookie.
11. Let cookies cool to room temperature and decorate!
After Baked, shape held together very well!
Original Recipe from : Sweetopia
Now for the Icing recipe I used, its super, super simple, just a few ingredients, I added a little something extra, tastes great, and is actually a really good consistency for decorating, and holds together very well. Hardens nice, but doesn't get to hard! My kids enjoyed these to much.
Ingredients:
1 cup powder sugar (confectioners sugar)
1 tablespoon milk
1 tablespoon light corn syrup
1 drop lemon juice (can be fresh)
1/2 teaspoon vanilla extract
* you don't taste the lemon juice at all, it just counteracts all that sugar to make it taste better!
Directions:- Place one cup of powder sugar in sifter. Try not to skip this step! Lumps in icing are hard to fix.
- Add one tablespoon milk, one tablespoon corn syrup,1/2 teaspoon vanilla and one drop lemon juice.
- Mix everything together. If the mixture still looks a little dry then add a little more milk 1 teaspoon at a time.
- Start decorating!
Came out just pretty!


No comments:
Post a Comment