Tuesday, December 31, 2013

Here's One For My Fellow Wino Momma's Out There!!


   I know there are some mommas out there who like their wine just like me, and when your a full time wife and mom you know a good glass, a very large glass when the occasion calls for it, is all you need to help you drown out the wild things running loose, screaming like some banchies running through your house, and the forth or fifth time you've fussed just doesn't cut it. Ahh we'll I let it slide when it's close to bed time because their burning the rest of their energy off, or so I desperately hope!
   Yesterday I cleaned my house, like I didn't just pick up things and throw them on top the bowl chair in the living room so the floor is clear a path. I dusted, moved things and mopped, I organized and put things in their proper place. I did laundry and actually put up the clothes rather than fold and leave in the basket for a week. And in the moment my house is immaculate because let's face it, it won't be long before the wild things are ready to leave another massacre of toys and junk through the house, I feel like a Champion!!!! I cleaned until 1 o'clock this morning, and by then I had three glasses of wine down so I wasn't complaining I was just happy I got the work done and got to enjoy my wine in peace and quiet, woo hoo! 
   Sometimes all it takes is a glass of wine and a good prayer to the good Lord above to get through the days of being a full time mommy! It gets hard and it gets frustrating a lot of times, sometimes there is no time to brush let alone wash our hair for days at a time. Or to dress nicely because you inevitably will get full of some substance or other from your rug rats. But sometimes all the hugs, kisses, cuddles,  glasses of wine (wink) and "I love you mommie's" are all the payment you need!
   I know I was called to be a full time mommy, so a lot of times when I get a second to relax with my glass of wine, I always try to shoot a prayer up to my Father in Heaven, and thank Him for simply giving  me the opportunity to be a mom, and a chance to do it over, and possibly better the days He continues to wake me up. Because we'll one day He might not, and I want to know that the my last day was spent being the best wife and mom I could be. 

   I'm hoping that I can soon have two new recipes for you. Now that I have a little leeway in my house work, I may be able to try them out soon, as we don't have any plans to ring in the new year tonight, so we may just spend it at home, and if we do, I want to make sure my kids will have a blast at home, so I may just have some helpers!
   I hope you all have a safe and Happy New Years, and a good time ringing it in!   


Thursday, December 26, 2013

Christmas Greetings

   I know I am a day late, but Merry Christmas to you all, I sure hope everyone had a wonderfully blessed day! We had such an amazing Christmas Eve and Christmas Day. My little loves received some Kindle Fires from Santa Clause and I don't even think they noticed they got other presents ha! But all in all we had a wonderful Christmas, I do have a new dessert to try, it's "no bake" so it's relatively easy it seems. I'm hoping tonight or tomorrow to do it, as of right now I am in the middle of trying to catch up on housework and picking up the reminants of opened presents and what not. I'm sure there are other mothers who can relate!! 
 
              As you can see they are not worried 
                             about other gifts!!
            The best gift in the world is getting to
                            be their mother!!


Saturday, December 21, 2013

Home Made Chocolate Turtles!!!

   Holy moly I have found the mother of all recipes, one for home made chocolate turtles, complete with home made caramel and everything! I am a huge turtle fan, so is my oldest son. I love them so much, and now I have my very own recipe for them, and worst of all (yes worst) they are DELICIOUS!! They make a ton, thank goodness I know how to share, I had to package some up and give them to some family, and I still have a ton left over!! This could be the most dangerous recipe I have ever stumbled upon!

Ingredients:

2 1/2 C pecans
1/2 C butter
1 C brown sugar
1/2 C light corn syrup
7 ounces sweetened condensed milk (1/2 of a 14 ounce can)
1/2 t vanilla
1 (12 ounce) package milk chocolate chips
1/2 t shortening (I use butter flavored Crisco)


Directions:

1. Toss 2 1/2 cups of pecans into a large skillet. Toast them over medium high heat, stirring occasionally, until they have darkened just a bit and smell fragrant and wonderful. Should only take a few minutes.

2. Find yourself 2 large cookie sheets. Line them with parchment paper and spray it with cooking spray. Arrange your pecans into clusters, three to a group works well. You want to leave some space (about an inch) between each cluster.
Image is from her blog


3. Make your caramel (full tutorial with pictures found here). Place 1/2 C butter into a medium-sized sauce pan. Melt it over medium high heat. Add  1 C brown sugar, 1/2 C light corn syrup and 7 ounces sweetened condensed milk to the pan. Increase the heat just a bit and stir it continually. Cook and stir until it reaches 235-240 degrees. I generally remove it from the heat when it reaches about 234 degrees. It will continue to rise in temperature just a bit even without the direct heat, making the caramel just the right texture.

4. Stir in 1/2 teaspoon vanilla.


5. Carefully drizzle about 1 1/2 teaspoons of caramel over each nut cluster. You’ll want to work quickly, as the caramel will begin to set up. Be sure there is caramel touching all of the nuts in your cluster. The caramel works like glue, sticking the nuts together.
My Image (not as pretty but still yummy)


6. In a microwave safe bowl pour 12 ounces of milk chocolate chips. Heat in the microwave for 30 seconds at a time, stirring after each cooking interval.
7. Add 1/2 teaspoon of shortening to the melted chocolate. Allow it to sit for a minute or two (so it can melt and make the chocolate chips more spreadable). Stir it all together

8. Spoon about 1 1/2 teaspoons of melted chocolate over the top of the caramel and nuts.
My Image as well!


9. Allow the chocolate to set up. Once it has hardened and cooled you can serve them immediately, or transfer them to an air tight container.

If you are a fan of chocolate turtles, you wont be disappointed they are just oh so good! I hope you try them and I sure hope you enjoy them!

Thursday, December 19, 2013

Fun New Ornamets!

   I just finished up all my ornament orders for Christmas, they took off better than what I was expecting, I cant wait to start again next year, only I will start earlier as I was swamped this December and its already a busy month for us. I am finishing up two ornaments of my own time as gifts for some special people so I cant wait to have that up as well.


   And of course this was a big hit, in fact it was a last minute order, and I have had so many people ask me to make them some and I cant get the balls I need because there out. CRAZY!!
Of Course Ninja Turtles would be the popular one hehe!

 
I was telling my husband last night, I will have to start ordering ornaments earl and working on them early especially the balls for the ninja turtles since they seem to be so popular!

Tis the Season for Baking, Baking, and More Baking!!!

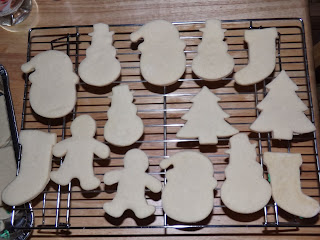
   It's that time of year, where families come together, laugh, catch up, open gifts, eat so much food they want to pass out! The minute December first arrives, it automatically kick starts our family get togethers, December is our busiest month out the year because we have so many family things to do, plus our oldest sons birthday is this month as well. So far  I have made my 4 Layer Berry Delight, which is always a hit! I also made some home made sugar cookies that are just fantastic for doing fun cookie cutter shapes. Did it as a practice run for Santa Clause, and of course all my Wild Things, including daddy wild thing taste tested. Not only are they good, My kids had a blast decorating them and getting messy. I found a great home made sugar cookie recipe, perfect for holding shape, and a great icing recipe that went quit well with the cookies and was really good for filling in and hardening nice, but not to hard!
    Recipe is as followed, and I will post the link where I got it from.

Ingredients:
2  1/2 cups unsalted butter (at room temperature)
2 cups sugar
2 large eggs
3 tsp vanilla 
5 cups flour
1/8 tsp baking powder
1 tsp salt

Directions:
1. Cream the butter and sugar together in the bowl of an electric mixer on low to medium speed.  (Use the paddle attachment).  Mix until thoroughly incorporated – for about one minute.  Scrape down the sides of the bowl with a plastic spatula and mix again for a few seconds more.
Over mixing the butter and sugar in this step will cause too much air to be incorporated into the dough.  If you’d like a light and fluffy cookie, that’s ideal, however the dough will spread more during baking; not ideal if you’d like the cookie to hold its shape.

2. Add eggs slowly and mix.  Scrape down the bowl with your spatula at least once and mix again.

3. Add vanilla extract.  Stir briefly.

4. Sift your dry ingredients together.  (Flour, baking powder and salt).

5. Add all of the flour mixture to the bowl.  Place a large tea towel or two small tea towels between the edge of the bowl and the electric mixer so that the flour won’t escape.  Mix on low speed for 3o seconds.  Remove the tea towels and observe the dough mixing; when it clumps around the paddle attachment it’s ready.  It’s also important at this stage not to over mix the dough (the glutens in the flour develop and the dough can become tough).

6. Roll the dough out between 2 large pieces of parchment paper.  Place on a baking sheet and into the fridge for a minimum of 1 hour.

7. Roll out the dough further if you need to, and cut out cookie shapes.  Place on parchment paper-lined baking sheet.  Re-roll scraps and repeat.

8. Put cookie dough shapes back into the fridge for 10 minutes to 1 hour to chill again.  They will then hold their shape better when baked.

9. Preheat your oven to 350°F

10. Bake cookies for 8-12 minutes or until the edges become golden brown.  The baking time will depend on the size of your cookie.

11. Let cookies cool to room temperature and decorate!
After Baked, shape held together very well!


Original Recipe from : Sweetopia

    Now for the Icing recipe I used, its super, super simple, just a few ingredients, I added a little something extra, tastes great, and is actually a really good consistency for decorating, and holds together very well. Hardens nice, but doesn't get to hard! My kids enjoyed these to much.

Ingredients:
1 cup powder sugar (confectioners sugar)
1 tablespoon milk
1 tablespoon light corn syrup
1 drop lemon juice (can be fresh)
1/2 teaspoon vanilla extract
* you don't taste the lemon juice at all, it just counteracts all that sugar to make it taste better!


Directions:
  • Place one cup of powder sugar in sifter. Try not to skip this step! Lumps in icing are hard to fix.
  • Add one tablespoon milk, one tablespoon corn syrup,1/2 teaspoon vanilla and one drop lemon juice.
  • Mix everything together. If the mixture still looks a little dry then add a little more milk 1 teaspoon at a time.
  • Start decorating!
Came out just pretty!
Recipe originated from: I am Baker


Sunday, December 1, 2013

Our Weekend's Christmas Activity

   So with Christmas creeping up pretty fast I'd like to think, we have been in the Christmas spirit early this year, but this weekend I decided to do a little Christmas Craft with the boys. This year we are a little tight with money so we cant go all out for everyone like we normally do. My husband just picked up extra work hours just so we could give the boys each 1 good gift and maybe some small things on the side, its not going to be much but were doing what we can.
   This year I thought what if the boys did some home made ornaments for like the grandparents and godparents. I know my mom appreciates things like that, and I think its sentimental especially for the younger ones to get involved. Friday night we made some salt dough ornaments that you have to bake for like an hour, but it made a ton, so Saturday we spend all day painting on them, it was just the most fun we've had in a long time. My oldest son is always asking to help me paint when I'm in my little studio and being as I have always been a stay at home mom, he doesn't quit get the whole working at home bit, I always have to tell him that I'm not painting just for me I'm doing it for other people. So let me tell you when he got to paint his very own ornaments, oh the joy in his face was something that just melts my heart. Now my two year old, well he had a blast, he was just excited momma let him get dirty IN the house, and he was so pumped to be doing something that his brother was doing.
   I got the recipe and directions for the salt dough on Kids in Cow Town. Comes with pictures and everything, such a simple recipe I was so pleased with everything. But here it is:

You'll need:

2 cups all-purpose flour
1 cup salt
1 cup warm water

Step 1:
Mix the flour and salt together in a bowl with a wooden spoon.  Add the water a bit at a time until your mix starts to look like cookie dough.  Turn out onto your work surface, knead it a few times and roll it out to approximately ¼ inch thickness.

Step 2:
After that, use cookie cutters to make your shapes, and place them on a parchment lined cookie sheet.  Before you put them in the oven, poke a hole in the top of each one with a drinking straw (this hole is for a hanging ribbon).  Bake at 300-degrees for 1 to 1 ½ hours. ( I took them out before the 1 1/2 hours was up. Just keep checking on them frequently right after 1 hour)
 
This was our end result after a full day of painting Saturday, and I mean a whole day worth of painting, of course we had to take breaks so they could dry and then we could turn them over and do the other sides. And then we made sure to keep going back and forth once they were dried to add more paint to make them extra special!


Their beautiful end result!
 

Long time no Post

   WOW, I mean WOW its been a long time since I posted on this site. I have been busy being a house mom, actually trying to perfect being a house mom and wife, or at least get into a good new routine and way about life. But I'm so ready to start blogging again, especially since I have seen a lot of my recipes getting some good pins on Pinterest. I have become quit attached to home making everything from scratch, and since I'm a stay at home mom I do have the time. So I am ready to take you all on some brand new adventures with me and my wild things, that are growing so fast each day, I believe the last time I posted my youngest was just a wee little baby. Now he is 2 years old and the wildest of the wild I believe, he definitely keeps us on our toes and laughing all the time.

My babies, growing up faster and faster each day.
 
 
   My the time is flying. I have opened a small little business in my home and I hand paint mostly plaques, right now I'm hand painting ornaments for the Christmas season. And also getting ready to do some yummy baking that I cant wait to share with you all! I am so happy to be back blogging, I do love to share all the fun stuff we do around here!
    I'd love, love to share with you some of what I am doing right now so here are just a few of the ornaments I have done so far, I hope you like them all :-)


   Oh I am so happy to be doing this again, life has changed immensely in the past year, I am doing what I love, I have come into a different way of life, still doing some growing, but I'm loving each new life lesson, especially the ones my children are teaching me. I hope that I am able to connect and share our happiness with others!